Wednesday, March 30, 2011

Hill's Frittata


Just got back from being out of town, so haven't been cooking anything lately.  Fortunately, I have another guest blog from Brian Hill.  He is a great cook and one of his specialities is coming up with his own breakfast and brunch items.  He makes different versions of this type of dish and it sounds like this one came together really well and will be a nice one for everyone to check out!

Sheri
**********************************************************************************
This is one of those “grab anything you have in the fridge” recipes that will delight you for a weekend or Sunday brunch.  It’s also a tasty concoction that can be different every time you make it!  On a recent Sunday we had a taste for something special and this frittata did not disappoint.

The first step in the process is thinly slicing white/yellow onions and sautéing them in olive oil until carmelized, about 8-10 minutes.  Add whatever other vegetables or meat you like.  We chose red peppers, mushrooms, bacon & sausage crumbles and sautéed for a few minutes before adding sliced white potatoes (canned) and spinach at the end.  Season with salt and pepper before adding 4 beaten eggs (or you can use egg substitute – but they are just not the same).  

As the eggs begin to cook use a spatula to keep them cooking evenly on the stove for a few minutes.  While the eggs are cooking add small cheese cubes to the mixture.  We used Gruyere cheese which is a great complement to all of the flavors.

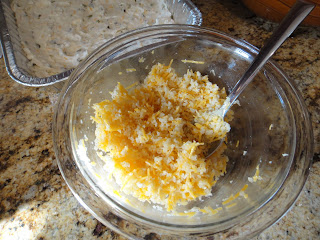
Once the eggs look about 80-90% cooked top the pan with a mixture of shredded Gruyere cheese and Panko bread crumbs.  Then put in the oven and broil until the top is golden brown and the eggs are cooked completely.


That’s it!  This is an easy and delicious brunch item that will satisfy.  In fact a friend once called our version of a frittata as “quiche with balls!”  Bon appétit!

Brian Hill (Guest Blogger)

Tuesday, March 22, 2011

Roast Boneless Pork Loin

I am always surprised when I try something that I used to think I didn't like to find out that I love it now!  That is how fennel has been for me lately.  Not sure how I was cooking it or when I was trying it, but it never tasted very good.  Over the last couple months I have added it as a side to a few dishes and it made the meal surprisingly better! This pork loin is just another one that falls into that category.  It turns out cooked perfectly moist and the roasted vegetables (including fennel) with it are fantastic!

Recipe by Ina Garten and photos by FT - Food Tasty!

serves 6

Ingredients:
2 cloves garlic, minced
Salt and freshly ground black pepper, plus 1 tablespoon kosher salt
1 tablespoon fresh thyme leaves
1/4 cup Dijon mustard
1 (3-pound) boneless pork loin, trimmed and tied
3 small fennel bulbs, tops removed
8 carrots, peeled, and thickly sliced diagonally
10 small potatoes (red or white-skinned), cut in quarters
2 yellow onions, thickly sliced
4 tablespoons good olive oil
4 tablespoons unsalted butter, melted

Directions:
Preheat the oven to 425 degrees F.

With a mortar and pestle, or in a food processor fitted with a steel blade, grind together the garlic, 1-tablespoon salt, and thyme leaves. Add the mustard. Spread the mixture over the loin of pork and allow it to sit at room temperature for at least 30 minutes.

Meanwhile, cut the fennel bulbs in thick wedges, cutting through the core. Toss the fennel, carrots, potatoes, and onions in a bowl with the olive oil, melted butter, salt, and pepper to taste. Place the vegetables in a large roasting pan and cook for 30 minutes. Add the pork loin to the pan and continue to cook for another 30 to 50 minutes, or until a meat thermometer inserted into the middle of the pork reads exactly 138 degrees. Remove the meat from the pan and return the vegetables to the oven to keep cooking. Cover the meat with aluminum foil and allow it to rest for 15 minutes. Remove the strings from the meat and slice it thickly. Arrange the meat and vegetables on a platter. Sprinkle with salt and freshly ground pepper to taste. Serve warm.
Enjoy!  Sheri


Tuesday, March 15, 2011

World's Best Homemade Burger

I don't eat many hamburgers, but when I do, I want it to be spectacular.  Most people have their favorite burger joint (mine's Booches, in Columbia, MO), but it seems the burgers I cooked at home were never as good as my favorite.  I would buy my ground beef, season it with all kinds of seasoning (dry and wet), mix it, form it in a ball, make a nice patty, throw it on the charcoal grill…but it always seemed tough -- I was never quite satisfied—Until recently!

I was watching America's Test Kitchen on PBS (see link below), and they were making what they claimed to be the best burger.  I tried the recipe (with a few revisions of my own), and my wife and I loved them.  The key is grinding your own meat, handling it as little as possible, and cooking it in a skillet on the stove.  I always thought I had to have a meat grinder, but it can be done in a food processor and it turns out great…Here are the details.

Equal parts boneless beef short ribs and Sirloin
White Onions, thinly sliced
Cheese (American or your favorite)
Salt & Pepper
Potato Buns (toasted)

Cut the meat into 1-1 ½ " chunks, place on a cooking sheet or plate, and put in the freezer until meat is firm.  Take equal parts of each cut of meat, and place in a food processor with metal blade.  Don't overload your food processor--it may take several batches to grind all your meat.  Pulse for 1 second about 8-12 times--until meat is similar in consistency to ground beef you would find in the grocery store (If you are unsure, keep it on the courser side).

Dump the ground meat on a flat surface, and with as little handling as possible, form into fairly thin, loose patties.  Add salt and pepper to one side, and place seasoned side down in a medium-hot pre-heated skillet (preferably an iron skillet).  Season the other side of the patty with Salt and Pepper while in pan.  Meanwhile, toast your buns in a pan.

Place a handful of onions on raw side of meat.  Cook the first side 3-4 minutes or until nicely browned.  Carefully turn burger, place cheese on top, and cook another 2-3 minutes (You should end up with a medium burger with little or no pink in the middle).  You may have to place a lid on your pan to get the cheese melted.  Take the burger from the pan making sure you get all your onions, and place on the bun.  Normally, I like tomatoes, lettuce, and an array of other toppings, but these burgers are good on their own.  I put a little yellow mustard, and it was perfect.  Of course you can decide how you want your burger, but taste it before you top it!
Click here for a printable version of this recipe.

http://www.americastestkitchen.com/video/?docid=25361  (Link to "Best Burger and Fries" America's Test Kitchen, PBS. Season 10 Episode 1022)

- Craig


Sunday, March 13, 2011

Spanish Beans and Clams

I have been craving clams for a while now and finally went to Bob's Seafood (best STL seafood place) to pick some up.  They definitely did not disappoint!  My go to clam recipe is linguine and clams, which I will have to put on FT sometime soon, but this time I decided to try something different.  After looking around for a while I came up with this recipe and will come back to it again for entertaining purposes since it was so good and not hard to make.  
  
Recipe adapted from The Heart of New England and photos by FT - Food Tasty!

Beans                                                                                            
Four generous portions:

1 pound dried beans, such as pinto, navy or lima, rinsed and soaked overnight (I used Great Northern beans since they are my favorite) or boiled as below
1 medium onion, diced
6 cloves garlic, minced
2 bay leaves
3 tablespoons extra virgin olive oil
1 carrot, peeled and sliced
2 teaspoons sea or kosher salt

Rinse and soak the beans overnight or cover with water and bring to a boil for 
15 minutes and then remove from heat and soak for 15 minutes. Drain the 
beans and place all ingredients except the salt into a pot and add water to 
cover by 1 ½ inches.

Bring the beans to a boil and then reduce the heat so that they just simmer. 
Skim off any foam. Cook them, loosely covered, until done, 1 – 2 hours, 
checking occasionally to add water if necessary. Add the salt and set the beans 
aside.

Clams:


24 littleneck or mahogany clams, rinsed and soaked in heavily salted water for 
1 hour
6 cloves of garlic, chopped
1 medium onion, diced
1/3 cup extra virgin olive oil
Generous pinch of saffron (I didn't use this)
1 tablespoon Spanish paprika (not smoked)
¼ cup chopped parsley
1/3 cup dry white wine (I used dry vermouth)
1 teaspoon red pepper flakes
Coarsely ground black pepper to taste
Sea or kosher salt, as needed

Heat a large heavy sauté pan over medium-high heat. Add the olive oil, and, 
when the oil shimmers, add the onion, garlic and pepper flakes. Stir until the 
onions are soft but not browned. Add the clams, cover the pan and cook, 
shaking the pan occasionally until the clams are opened. If smaller clams open 
soon, remove them and set them aside.

When all clams are opened, return any previously removed. Spread the 
paprika and parsley over the clams, add the saffron to the wine and add to the 
pan, along with several grinds of black pepper. Cover and cook for five 
minutes.

Reheat the beans in a large sauté or frying pan while the clams finish.

Pour the clams and all juices and contents over the beans and stir the juices 
into the beans. Serve with the clams on top of the beans.

Traditionally, this is served with crusty bread and a full bodied white wine.
Click here for a printable version of this recipe.

Enjoy!  Sheri


Beans soaking night before.
Ingredients for the beans.
Ingredients being sautéed for beans.
Beans cooking.
Ingredients for clams.
Clams rinsed and ready to cook!
Ingredients being sautéed for clams.
Clams added but not open yet.
Clams are opening!
Beans are ready to add.
Beans and Clams together!

Tuesday, March 8, 2011

Chicken Pot Pie


The great news for me about keeping up with this food blog is I have a lot of friends who are really good at cooking and can contribute some outstanding recipes when I get slow with my posts!  Here is a recipe that Brian Hill (Guest Blogger) has made for us before and it really is the perfect comfort food. When he says to let it cool, he isn't kidding. The pots are crazy hot when they come out of the oven! 

Sheri 
*******************************************************************************************

Winter is almost over (thankfully!) but there is still time to enjoy more comfort food!  Comfort food may be the only good thing about winter, in my opinion.  This recipe has become one of our favorites.  In fact Deb has craved chicken pot pie every couple of weeks this entire winter!  I saw Ina Garten make this on her Food Network show and followed the recipe exactly at first.  But the last few times we have added or enhanced it as we make it.  One of the best things about chicken pot pie is you can make it the same or different each time.  Feel like something a bit spicy?  Add some creole seasoning and okra instead of peas and call it Creole Chicken Pot Pie.  We decided we missed potatoes so we added them and it was even better than the original version without them.

One of the most important things in chicken pot pie is making sure you have good chicken.  For 4 pot pies we roast 3 large bone-in, skin on chicken breasts.  Just rub them with olive oil and season with salt and pepper and roast on a cookie sheet at 325 degrees for 40 minutes.  Let rest/cool before de-boning and cutting the moist chicken meat into chunks or tear into shreds if you prefer.  You can make the chicken ahead of time if you are pressed for time when making the pot pies.

Next you want to get all of the vegetables ready for the filling.  Cut the carrots and potatoes into small or medium size chunks (again it’s all about your personal preference).  Blanch them in boiling water for about 3-5 minutes based on how tender you want them to be.  They will cook for an hour in the pies themselves.

The filling in this recipe is very simple and delicious.  Heat 4 cups of good quality chicken stock in a sauce pan so when added to the roux it doesn’t get lumpy.  Add 1-2 chicken bouillon cubes to the stock to enhance its flavor.  I highly recommend making your own chicken stock if you have the time (3 hours or so).  There is a homemade chicken stock recipe at the end or use a good quality store-bought stock.  In  a Dutch oven or large pan sautee the chopped onions in 1 stick of butter (no one said comfort food is healthy!) for about 10 minutes.  Add ½ cup of flour and cook for 3-4 minutes to make sure the roux doesn’t wind up tasting like flour.  This is a basic roux and gives the filling a rich, satisfying flavor.  Add the hot chicken stock a little bit at a time and stir to the desired consistency.  Again this is a personal preference – some people like a thicker filling and some not so much. 

After your filling is at the desired consistency add the chicken, vegetables, heavy cream and season with salt and pepper.  I can’t resist tasting at this point to make sure it is right – and because I can’t help myself at this point in the cooking process! 

Now you are ready to prepare the pot pies for the oven (preheat to 400 degrees).  You need 4 oven proof crocks that can hold about 2 cups or so of filling.  We purchased oven proof soup bowls from Schnucks of all places ($3.99 each).  We looked at Crate & Barrel and Bed, Bath & Beyond and could not find these crocks but the new, Des Peres Schnucks had them in the kitchen wares section!  Make an egg wash by beating one large egg.  Use a pastry brush and coat the top rim and upper outside portion of the crock so the crust won’t stick.  Fill each crock with the delicious filling and top with store bought pie crusts.  Ina Garten made homemade crust, of course, but we felt it was not worth all of the trouble.  We have not been disappointed with Pillsbury premade pie crusts in the refrigerated section of the grocery store.  No need to do anything with the crust other than cut in any shape you choose and cover the crock letting the crust go part-way down the sides.  In my opinion the more crust down the side of the bowl the more you have to dunk in the pot pie!  Brush the entire crust with the egg wash so it will have a nice brown finish.  Cut 3 small slits in the top of the pot pie to allow steam to escape.  Season crusts with kosher salt & black pepper.

Bake at 400 degrees for 1 hour.  Make sure you let these babies cool down a few minutes because trust me they will be HOT!


Ingredients:
3 large bone-in, skin on chicken breasts
Olive Oil
1 stick unsalted butter
1-1/2 cups chopped yellow onion
½ cup flour
4 cups good chicken stock (try home-made!)
1-2 chicken bouillon cubes
1-1/2 cups Yukon Gold potatoes, peeled & cubed
1-1/2 cups carrot, peeled & cubed
1 cup frozen pearl onions
1-1/2 cups frozen peas
¼ cup heavy cream
1 package Pillsbury Already Made Pie Crusts (2 crusts per package)
1 large egg, beaten
Kosher salt & black pepper (to taste) 


Chicken Pot Pie - Homemade Chicken Stock

Homemade chicken stock is amazing!  You cannot even compare it to store-bought stock.  And believe it or not, it’s easy!  It just takes some time and patience.  Start by buying a whole chicken, either already cut up or cut it into 4-6 pieces when you get home.  Rinse chicken pieces thoroughly with cold water and pat dry.  Put chicken (including heart, liver, gizzard, neck, back) into large stock pot and cover completely with cold water.  Add 1 carrot cut into large pieces, 1-2 stalks of celery cut into large pieces, a quartered onion, 4 oz. or so mushroom pieces (can be stems only if you need the mushrooms for other purposes), 2-3 stems fresh thyme (or ½ teaspoon dried thyme), 2 bay leaves, 3-4 whole cloves & 10-12 whole peppercorns.

Bring the pot slowly to a gentle simmer and keep at a temperature that prevents it from boiling during the entire cooking process.  You want a nice, gentle simmer.  DO NOT BOIL AND DO NOT STIR!  By not stirring or allowing the stock to boil it keeps it CLEAR which is important.  Let this tasty mixture simmer for 2 hours or so.  Carefully remove foam from the top as it appears.  After 2 hours or so remove from heat and either pour through very fine strainer or ladle carefully into a large bowl.  Allow stock to cool completely and remove any fat on the top.  Put into airtight container and store in a cold part of refrigerator NO MORE THAN 5 DAYS.  You can also freeze for 2-3 months.

It is wonderful having homemade chicken stock available for soups, rice dishes, polenta or grits.  It adds so much more flavor than store bought stock.

Enjoy!  Brian Hill (Guest Blogger)

Tuesday, March 1, 2011

Jalapeno Popper Dip

It's always fun when someone starts telling you about a dish that you haven't heard of before and you can tell immediately it will be a big hit!  One of my friends was mentioning she was bringing this tasty appetizer to an Oscar party.  Once she started explaining the dish, it sounded amazing and I thought it would be perfect for her to pass on to you guys.  So here is our second official guest blogger, Rachelle Holt to take it away!    
**********************************************************************************
This simple, tasty dip is my new go-to recipe for an addictive appetizer to take to parties! Everyone seems to love it, and the comment is always the same ... "It tastes just like a Popper!"

You can tailor the recipe to your liking based on the amount of jalapeno, but here it is as Schnucks (our local grocery store) intended ...

Jalapeno Popper Dip
Prep: 5 minutes  Bake: 20 minutes  Makes: about 3-1/2 cups

2 packages (8 oz.) 1/3 less fat cream cheese, softened
1 cup mayonnaise (I use the light version to save on calories, and you can't tell a difference)
1 cup finely shredded sharp Cheddar cheese, DIVIDED
1/2 of a 12-oz. jar (approx. 1/2 cup) diced jalapeno peppers, rinsed and drained (I couldn't find diced, so I simply dice the slices in my chopper)
3 tablespoons unsalted butter
1/2 cup panko breadcrumbs (find in Asian aisle)
tortilla chips

Preheat oven to 350. In medium bowl, combine cream cheese, mayo, 1/2 CUP Cheddar and jalapeno; spread evenly in pie plate or shallow 1-quart baking dish.

In small microwave-safe bowl, heat butter until melted. Stir in panko and remaining 1/2 CUP Cheddar. Sprinkle panko topping evenly over jalapeno mixture.

Bake 20-25 minutes or until topping is golden brown. (I like to put under broiler for the last couple of minutes of baking to get the topping nice and brown.)

Serve warm with chips. (And, preferably a margarita or Corona!) 


Enjoy!  Rachelle Holt (Guest Blogger)